Friday, December 4, 2020

Bridesmaid Revisited: a look at the sartorial details of my modest wedding glamour

After the deliciously romantic wedding day is over, what does a bridesmaid do with the gorgeous dress, the gasp-worthy shoes, the sparkly jewellery, the cute jar lantern hand-decorated for her by the bride?
My sister's forest wedding was four years ago this week. You can view the Boutique Narelle post about Sarah's special day here.

Today I'm revisiting the particulars of my luscious bridal array so that we can enjoy them together.

My Satin and Lace Dress


The *daffodil* stiff bridal satin and thick polyester lining were sourced from China (www.JayJays.com - best tip: always order fabric samples first). The pale yellow nylon lace was found at the back of a local general supplies shop. It took 5 months of effort to get that far. And a knobfustered courier, who wandered past the house and into my back garden with the delivery from China, and deposited the box amongst pots on a garden bed. Where I happened upon it a couple of days later, thankfully before it rained.


Sarah was a generous and thoughtful bride. She offered her maids a dress pattern that was flexible, suited to our different figures and tastes. She gave us a preferred colour palette, and the two of us individually hunted for fabric that would please both bride and maid. This was an extended shopping effort conducted from our residences in three different cities. We could not have done it without handy phone cameras and photo messaging. Clearly we all have good taste, because we all approved of each other's choices.


To avoid the prickle of nylon lace,
I covered the neck and armhole seams 
with narrow satin ribbon.

It took me seven weeks to create my gown. I sought professional tutoring to help with getting a perfect fit. It meant it wasn't a cheap dress, but it was the most luscious and best fitting gown I'd ever worn. It was designed for me, and I felt like a princess in it.

The frustrating part is that after 10+ years of not being able to put on weight, in the four months following the wedding I put on over a stone (6.5kg). I've dropped some of that now, which is why I was able to attempt this photo shoot. The gown does, however, give evidence of being under strain. The buttons down the back met perfectly on the day, giving one guest, who conveyed he has an eye for the particular, a focal point to ponder.

My Bejewelled Shoes


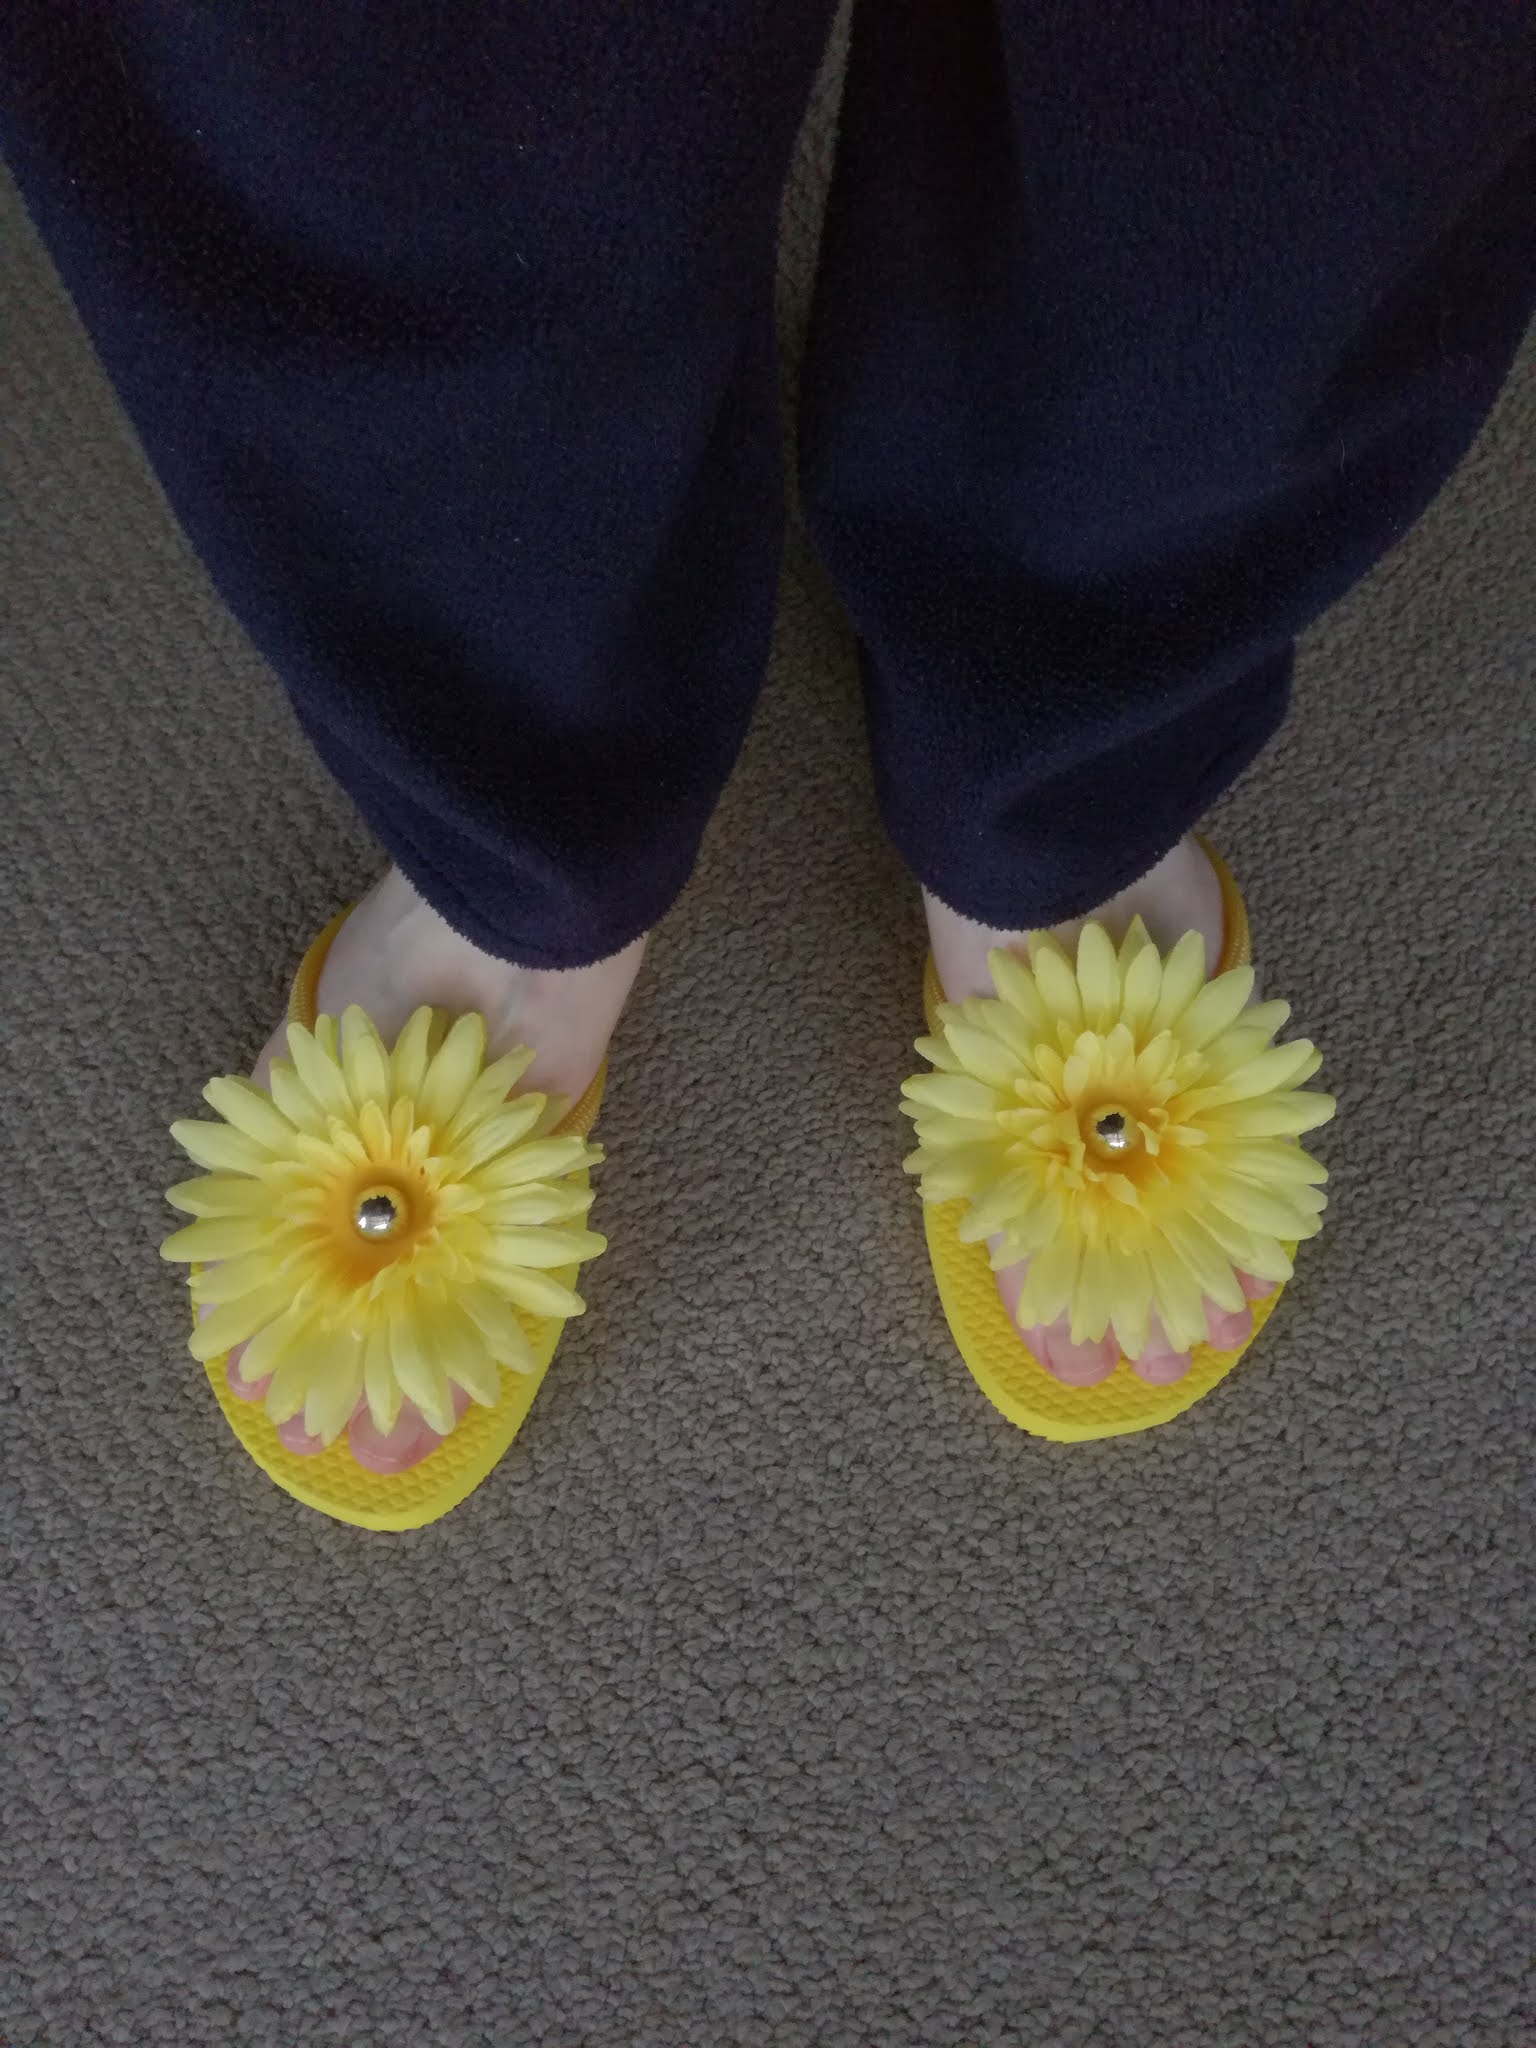
With leather upper and lining, these fit my feet perfectly and felt great...except when walking. The factory missed a key point that the sole ought to be level and without ridges. I liked the upper portions enough that I decided not to return them to China. Besides, China had been a last resort because I couldn't find suitable shoes in New Zealand. I took yellow Jandeys (a Kiwi flip-flop brand) sporting a yellow gerbera each (my addition) to wear for the more casual reception.


The winter primroses flowering when the jandals arrived gave inspiration for the summer gerberas... Creative note: I didn't find a glue that would adhere plastic to flexible rubber. I recommend tying the flower onto the thong with thread.

My Golden Coronet


Sarah planned to wear her long tresses loose with just a little bit caught away from her face. She enhanced this by crafting her own floral wreath using satin flowers and ribbon which she also used on her dress.


We had begun pondering bridesmaid hair styling when I spotted a hair band at Farmers department store that seemed to blend quite well with the floral theme. A bonus was it came in both silvertone and goldtone, offering options to suit the different skin colouring of the two bridesmaids. I sent a photo to Sarah. She liked it. We showed Bethel. She liked it. Bethel bought a silver one. I bought a gold one. Everybody happy.
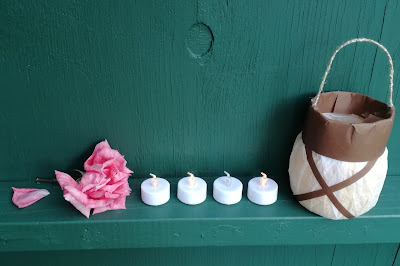

My Lantern Bouquet


The bride didn't want her bridesmaids carrying flowers. Instead, she handcrafted for each of us a glass jar lantern toned to match our dress, using brown construction paper and yellow and white tissue paper for mine, red construction paper and pink and white tissue paper for coral-gowned Bethel.


Sarah placed four battery-powered tealight candles in each jar. Their flickering light reflecting against the coloured tissue paper lining, caused the jar to glow. It created a beautiful effect in the glade of the redwood forest. The lanterns also created a thematic reflection of the Bible that the bride carried instead of a floral bouquet.

My Bridal Emergency Kit


Fulfilling my handmaiden duties with aplomb would not have been possible without my Bridal Emergency Kit. See today's bonus bridal post for more details on what my kit contained, and how the kit saved the bride from a wedding day disaster.

I hope you've been inspired today by something modest and beautiful.

Fiat lux.

Narelle


Narelle's Bridal Emergency Kit: what to tote to prevent wedding day disasters


Having heard many horror stories of wedding day trauma caused by a variety of mishaps, I prepared a Bridal Emergency Kit to have handy on my sister's wedding day. I was determined that she would not suffer from any such distresses if I could help it.

Narelle's Bridal Emergency Kit

Stowed in a tote bin:

Bottled water
Include bottle of water+salt for hayfever cure (¼ tsp of ground rock or sea salt per litre of water)
Box of tissues
Small rubbish bag
Chair, footstool, cushion
Rain umbrellas or shade parasols
Cool-weather shawls for bride and maids
Handheld fans for hot weather
Non-messy energy snacks
Phone, payment card, and cash in case of vehicle breakdown or empty fuel tank

Stowed in a zipped purse:

Adhesive tack
Paper & pen
Wet wipes
Another small rubbish bag
Sewing kit (needles, reel of white thread, sharp scissors, straight pins, safety pins)
Painkiller (water bottle in tote bin)
Lens cleaner
Cotton buds
Bandaids
Mirror
Makeup
Nail file
Tweezers (I packed my SwissCard multi-tool)

The key to creating an effective emergency kit is envisioning likely difficulties. Of course, sometimes things happen that no-one would have imagined, and it's then you have to get creative with what you have.

On the wedding day, the nail file was needed to smooth the bride's rough shoe heels that were snagging and tearing her net petticoat.

The sewing kit was in high demand, used for finishing the principle bridesmaid's dress hem, fixing parts of the groom's costume, and cake decorating. (Scissors, needle, and thread to bind the flower bunches, straight pins to skewer the calligraphy poster to the icing, tweezers to position the sugar-sticky loose petals.)
There were two items I wished I had: an extra clothes peg to hang my music from the microphone cord when I played the piano at the reception (the peg I used at the wedding ceremony got lost in transit), and a cigarette lighter to seal the ribbon ends on the cake decorations when I became the emergency cake decorator.

I hope this list helps you and your loved ones be prepared for unexpected mishaps on your special occasion. Relax, laugh, work together, and I'm sure you'll have a good one.

Fiat lux.
Narelle

Friday, November 6, 2020

A Better Stripe: How to Upcycle a Miniskirt into a Pinny Apron


What might a modest woman do when she's given a miniskirt?


She might upcycle it. Here's the miniskirt I was given...


It looked worn and dirty, stapled together at the front, saggy and stained at the back. But the label said linen/cotton
, so I thanked the giver with delight and gave the brief little skirt and its self-fabric tie belt several rounds of attentive laundering.

Many of the stains remained, but for what I had in mind for it, they would be in good company. With a crisper fabric in hand, I deconstructed the skirt, removing the side zipper and back pockets and unpicking the side seams.

Here's how I reconstructed it, turning a miniskirt into a pinafore apron.


1. Shape sides of pinny bib. Keeping the skirt front in same position for pinny, use the skirt back for the pinny bib. Flip the skirt back topside-down so that the waist band stays at the waist and the skirt hem is now under the chin. Fold under the extra width until it's a good fit at the shoulders, and stitch these flaps down the sides at the seam edge (but not across the top).

2. Reattach pockets. Cut and stitch linings for the two pockets, then sew them to the bib.


3. Shape upper edge of pinny bib. Pin about 5 inches of 1 inch cotton tape at centre front on the reverse side to stabilize the fabric (the linen had stretched and warped where the skirt got sat on). Sew a gathering stitch down each side of the tape, securing the stitches at the bottom end. Pull up the gathering threads, arrange the gathers, and handstitch the threads to secure the gathers.


4. Prepare skirt front. Stitch any seams or hems that were opened during the deconstruction phase. (Do this also with the waist edges of the bib.)

5. Join bib to skirt. Lay the bib waist on top of the skirt waist, making sure they are centred. Pin and stitch together.

6. Prepare straps. Cut tie belt at the halfway point. At upper edge of bib, insert raw ends of belt into the outside corners of the facing created when folding in the bib sides. Pin. Stitch across upper edge of facing.

7. Add hanger loop. Using a strip of cotton tape or bias binding, attach a bar behind one strap so you can easily hang your apron on a hook.

8. Sew button holes. Use an interfacing on the underside to give the buttonhole stability. Mark location for buttons and stitch on buttons.


I like that this apron style is cool and light, no bands around my waist, no dragging at my neck. I tried fastening the straps with just the button in the centre, but the apron shifted around too much as I worked. Adding the side buttons improved stability. If the apron needs to accommodate more bulk under it (likely in winter, when I wear more layers), I could place buttons at the hips and not use the upper and centre buttons.

The flower was glued to a button, which was glued to a felt dot, which was glued to an earring clip.

Now you know how to upcycle a miniskirt into an apron. I hope you've been inspired today to look at old garments as new possibilities.

Look out for more Boutique Narelle posts detailing liberating modest fashion techniques.

Fiat lux!
Narelle


Friday, October 2, 2020

Hummingbird Blue: Assembling an Elegant Outfit from Awkward Pieces


Tragically, my city no longer has a fabric store. Here's how I get over that hurdle when I need coordinating material to make an outfit. Instead of buying new fabric yardage, when I shop for an outfit at a secondhand store, I source fabric from other garments on the rack.

I look for one main piece in a fabric or colour I like. Any adult size will do, usually the larger the better. Next I look for other garments in fabric that will coordinate with my first piece. I then rearrange the fabric from these garments to create one outfit or dress.


Hummingbird Blue


When I spotted this hummingbird fabric, I immediately loved it and longed to wear it. Given that it was assembled as a spliced and skimpy jumpsuit, it would take some creativity to make it modest and wearable. But I was willing to try, because I loved the fabric so much.

Now I knew I was looking for blue. I hunted around the racks and to my delight found a floor-length taffeta skirt in a shade that matched the hummingbird beautifully. The skirt was far to big for me, but this made me even happier - I had more fabric to work with.


Then I found a chiffon tunic with a knit camisole attached to it. The tunic was too big and too revealing to wear as it was, but I really liked the drape of it and it was in a shade that toned with the other items.


Concerned about cool evenings in a sleeveless dress, I was happy to find an elegant cardigan, although this too had a fit issue.

Now I had my ensemble, but they needed assembling!

Deconstruct the Skirt


Step 1. Unpick the skirt waistband and zipper. Sew up the seam where the zipper was.

Reconstruct the Skirt


Step 2. Detach the camisole from the tunic. Sew the skirt waist to the camisole, creating a tank dress. (Before stitching them together, I added a short skirt lining using a remnant from my stash - lined skirts feel so comfortable to wear!)

Reconstruct the Jumpsuit


Step 3. Unpick the leg/crotch seam of the hummingbird jumper suit and cut away the scoop of the crotch extension, leaving a straight edge down the back and front. Unpick the hem a little on each side of the raw edges to give you room to work. Sew the fronts together and the backs together, then rehem the bottom edge. Now the jumpsuit is a tunic.


Fix Fit Issues


Step 4. The hummingbird tunic still had some gaping areas with keyholes front and back, and low armholes. These were easily fixed with some pinch and stitch action.


Step 5. The fitted chiffon tunic sat too low on my bosom, making puckers in odd places and allowing for more movement than felt safe for my modesty. The armholes were also too large. Because the fabric was so light, I was able to pinch the shoulder seam up without creating too much bulk. This improved the fit at the bust and front neckline, and reduced the armholes. I arranged the sleeve gathers to please me, then handstitched them in place at the shoulder.

Step 6. The knit viscose cardigan was designed for a lady with longer arm scye and more bosom than I have (this is also why the chiffon tunic didn't fit me). I gathered the extra fabric into a series of pleats and stitched them by hand, turning them into a style feature that encourages me to wear my hair up so they can be seen.


Styling Choices


An alternative might have been to make a long dress by sewing the hummingbird tunic to the taffeta skirt, but this way the soft drape of the delicate tunic is retained, and the outfit is more flexible. I can change the look by changing the style of tunic. I can also wear a tunic over a different dress or with wide-leg trousers.

I hope you've seen something beautiful and inspiring here today.

Look out for more Boutique Narelle posts detailing liberating modest fashion techniques.

Fiat lux!
Narelle